Monday, November 7, 2011

Week03 followup

Saturday peeps have their cobbler, and reports are back that it is good! I had some myself and I agree.

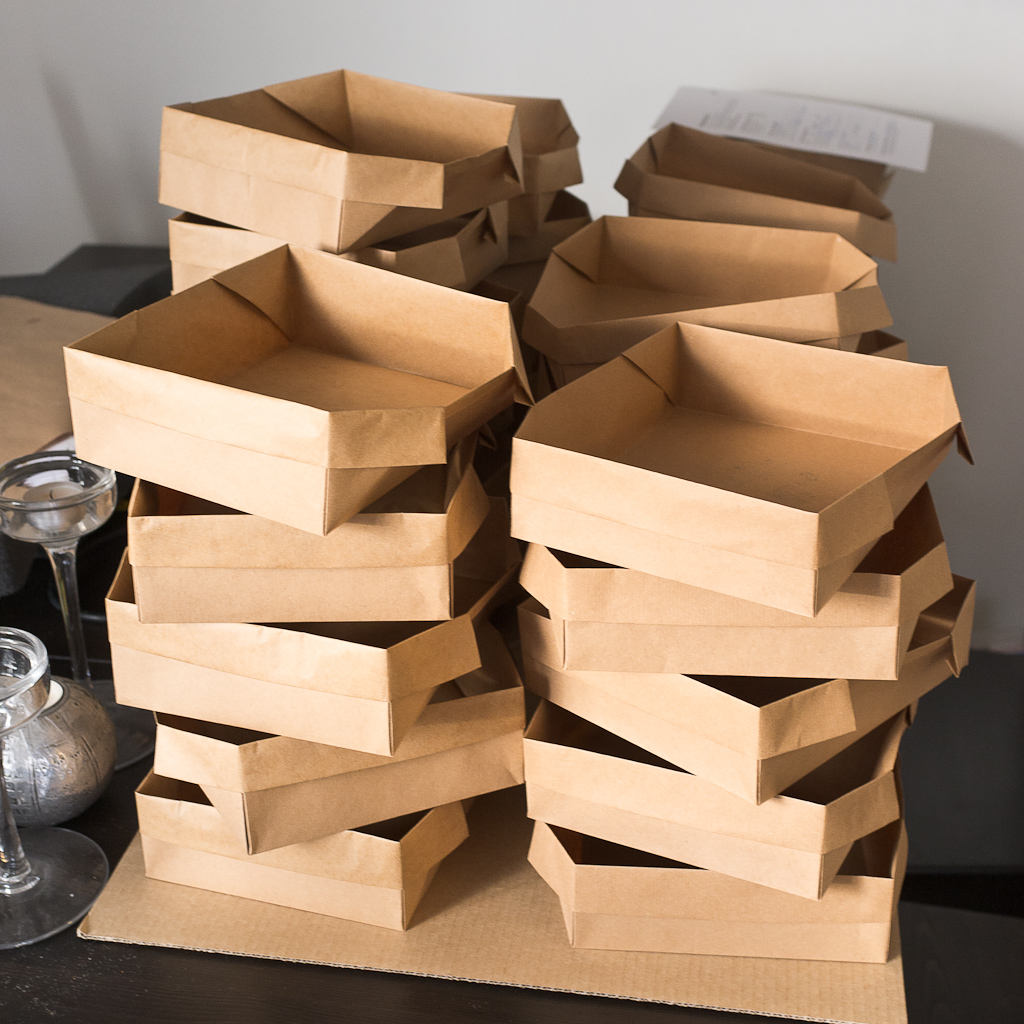
Boxes ready for pie! (cobbler) Each package takes roughly 11 minutes to create.


5 kilos of strawberries!


Two cobblers ready for the oven. The photos from the first post about the cobbler was with only 500 grams of berries, but I upped it to 750, which solved the "boring top" problem. Now a bit of berries stay above the crust line and give it a great texture and color variation.


Monday, October 31, 2011

Week03 Strawberry Cobbler


Week 3 had some hickups, but that's why I start the experiment early on Sunday, so I have over a full week to perfect things and ensure I have all the ingredients and packages. First was the square package design. This is the only one that requires folding, and it took some time to get a fold that held nicely with only the baking paper exposed to the food, water-tight, and held it's shape. You can see the first 3 tries in this image, the one in the front is what I went with. I have to fold the baking paper and craft-paper at the same time, and at the last minute before opening into the box shape, slide in a cardboard square between them to give the bottom strength.


Next I had a problem with the temperature and timing. The original recipe assumes a much larger glass dish with a shallower desert. I like the dough portion soft and moist, which requires it be thicker, which through off the timing. Also putting in the strawberries first was a no-no as the juice soaked into the baking paper, cardboard, and ruined the stiffness and nice presentation. It did make for a nice photo though with the batter spreading over the strawberries!

I also had another problem. The container wasn't stiff enough, and the batter wanted to run out, pushing the sides down. I made a quick brace for them while they're baking out of un-coated wire (so it will bake safely). After it cools, it retains it's shape nicely without the braces.


Sugar, whole milk, cinnamon, and of course, flour and butter.


Batter goes in first, I cut down on the milk amount from the original too for a more viscous and dense pastry. It's not wet enough to soak into the baking paper.


Strawberries go on top, a full 750 grams, 3/4 a kilo of berries!


I cut a slice so you can see into the warm moist goodness (the uncut top is slightly boring).

And finally with stamped lid.


It's so gooey and nice. A quick zap in the microwave or oven, add Ice Cream, and you're in heaven!


Week02 followup

Some pie porn from week02 first delivery day. The peanut butter all in place.


Next the chocolate ganache and peanuts.


All boxed up for delivery.

Sunday, October 23, 2011

Week02 Peanut-butter Pie

This week's dessert is Peanut Butter Pie with a dark chocolate cookie crust, and a dark chocolate ganache topping with chopped peanuts.

First, the chocolate cookies are blended with butter and dark chocolate.


This is pressed into the container and baked for 10 minutes. The cookies I found have chocolate creme in the middle. The creme was very sweet and low on cocoa mass, so I made an experiment. On the left in the brown paper, I scraped the creme off each cookie, and on the right, I blended them with creme intact (which would be much faster). The taste test though showed it was much better without the creme, so that is how it will be made. Part of why I love this business is that I can justify experiments like this in the name of bringing you, my customers, better products.


Chopped peanuts for the topping. These are salted and roasted peanuts, just how I like them.


Peanut butter, cream cheese, sugar and vanilla extract is blended together. Not shown is the cream whipped till solid and then folded in to make it creamy and fluffy.


Pour in the mixture on top of the baked and cooled crust, and let it firm in the fridge.


Next, I heat whole cream with dark chocolate till it blends smooth.


Pour this rich ganache over the peanut butter filling.


Finally, sprinkled the edges with peanuts and allow to firm in the fridge further.


Week01 followup

The first deliveries were made flawlessly. Only 4 customers on Saturdays right now, but this is already giving me the idea that I have to have spots split per days, so that I don't get 50 on Wednesdays and only 10 on Saturdays.

The packages all made and ready for cookies.


Cookies cooling and one package already loaded.


All tied up!

Saturday, October 15, 2011

Week01 Tri-Chip Cookies

The first delivery is just a week away! The first week's recipe is Tri-Chip Cookies. The three chips are dark chocolate, butterscotch morsels, and white chocolate chips. This recipe is the Plan B recipe for the upcoming weeks. So if you do not like the main recipe when I email you the week ahead, just tell me if you'd prefer these cookies again, and you can take your portion in cookies instead.

First I had to find the right chocolate, I tried 3 different types, a 16%, a 36% and a 49% cacao mass chips. I was pretty sure the 49% would be best, and I was right, but I wanted to be sure.


Here is a photo of all the chips for a single batch of cookies. One cup of dark chocolate, half of butterscotch and half of white chocolate.


First you cream the butter and sugars.


Then you add eggs.


Then flour, salt and rising agents.


Then the chips!


Next I roll the dough out to the proper thickness and cut with cookie cutter to ensure the right amount per cookie.


Hveiti og Smjör tries to use ecological options whenever possible. Local ingredients, leg power instead of gas, and recyclable materials instead of plastic or styrofoam. All baking paper and bottom portion of delivery containers are made with If You Care brand baking paper. It's made without bleach, using silicon instead of quilon for less impact on taste and less pollution to manufacture.


Pulling the finished cookies out always makes me happy.


Cookies are placed on a rack to cool immediately for a chewy-er final cookie (leaving them to cool on the tray makes them crunchier)


Packaging is made from If You Care non stick parchment paper, and Kraft Paper, both recyclable, and tied with plain cotton twine. Brown paper packages tied up with string, these are a few of my favorite things!


Here you can see the lower half of the package:


And the stack removed. This is only a half batch! (8 cookies) Those customers on the full batch plan will receive two such packages for a total of 16 cookies.

Friday, September 30, 2011

Logo and stamp design


One thing I've really enjoyed about trying to launch this business, is the fact I get to do all the marketing and design. I find marketing, when it's designed only to inflate something weak, to be very off putting. However there are good products and services, that need to communicate what they do, and in those instances, marketing and branding is fascinating and I really enjoy it.

The focus of Hveiti og Smjör is going back to basics, both in recipes and ingredients, as well as the interaction between baker and customer. The recipes are tantamount. I am choosing only heavy, sweet, moist baked goods, hence the name, Hveiti og Smjör (in Icelandic, it means "Flour and Butter"). I wanted something descriptive, but simple. There is no hiding that these will be calorie dense treats. They are designed to replace the numerous empty snacks in the week, and provide a once a week treat of a much higher quality.

They are hand made, by the proprietor. These are not from mixes, or from an industrial kitchen that services ten or more bakeries. It is the only source of these delicious snacks, and the logo and branding needed to reflect this. I am using heavy brown paper as the packaging, tied with hemp twine. I want to invoke the days when you went to a town store and interacted with the owner. Everything should point to this simpler time. This made me think of using a stamp, rather than a label or sticker. First, it produces less trash, applying directly to the already needed packaging (which is itself recyclable, being paper), and second, it's much more old fashioned, again pointing to a simpler time.

I started with finding around ten fonts with open usage rights that I liked the look of. I found a brown paper texture for my background in photoshop, and applied a layer style to get them to look like they had been impressed on the paper. I checked each of the ten fonts in the right layout to see which one spoke to me with the right feel. The font I ended up with is called Harbara, and I love it. Next I sketched the simple flour sack, having a few real photos, as well as cutesy animator drawings. I tried it also with a rolling pin, and with an unwrapped stick of butter, but preferred the simplicity of the open sack by itself. I quickly shaded it and used the halftone filter to create the dots so it would reproduce in a single color and still have volume. I feel like logos work better that have some graphic element rather than just text.

Having made a mockup I was happy with, I found a local Icelandic stamp manufacturer, emailed off a high-res tiff file, and 3 days later got this beautiful stamp. It makes the logo at 10x6cm (around 4x2.5 inches).


Here I have flipped the image in photoshop so it can be read, but the real version is reversed so it's imprint will read correctly. The dot pattern reproduces very well.


An actual imprint from the stamp.

I also wanted to play around with a teaser image, but I've decided I want to do an actual advertising campaign using this format of bodies mixed with baked goods and a witty saying.


Now the website is almost finished. I'm working on finding a credit card processing solution, and Ágúst (my husband) is working on the database management system and mass mailer.