
Part of the business model of Hveiti og Smjör is to be as ecologically friendly as possible. One way I do this is by bicycling your deliveries to your house, rather than driving. (I also fetch the raw ingredients from the store this way). This required a custom built delivery method, which I designed myself. Two water-proof fiberglass boxes, attached to a Free Radical bicycle frame extender from Xtracycle. Above you can see a photo of me on the bicycle with the two boxes. This post will walk through the process.

The donor bike before starting. A Trek 540 bicycle. Trek still makes the 520, but it is all steel frame, whereas the 540 was made for only a few years, and is an aluminum frame.

These are fish boxes for shipping frozen fish. I was originally using just one of these attached to a rear bicycle rack, but it can only hold a few deliveries, and the weight was really off on the bicycle, it being so high. However tilted sideways, they are exactly the size I needed. So I pressed the lids closed tight, and used them as the mold for the fiberglass.

I sanded the corners to be rounder since that would be stronger and easier to mold the fiberglass mat around.

Because fiberglass resin will eat into foam, I wrapped the boxes with a heavy black trash bag, then taped it tight.

Here I'm cutting the fiberglass mat (600 gram) to the right shape and testing how it will lay over the box.

More supplies laid out.

The resin, toxic stuff, had to wear a mask and gloves, and throw out the brushes after each use, there was no way to clean them. The resin itself will stay liquid forever, but if you add the catalyst (those small bottles on the far left) it will harden in a few hours, and be totally strong and dry in 24. I used aluminum cans cut in half for the containers since they also needed to be disposed of. (you can see one on the far right)

Two layers painted on. At first the mat seems not to absorb the liquid, but after about 20 seconds it starts to get wet, and after about a minute, it becomes kind of melty, and you can press it to any under layers and it will stick. Fiberglass has to be made of at least two layers or it won't be very strong. I painted the trash bag first with resin, laid on the first layer of mat, painted it till it was soaked and sticking, then laid the second layer over top, and painted it till it clung to the bottom layer. Any corners or stiff areas that might not stick initially, I just wet, waited a minute, then was able to press it together.

Twenty-four hours later, the resin was cured, and I could take the mold out. The whole thing was flipped, the bag cut with a carpet knife, and after cutting a valley through the center of the box, was able to pull it out.

You can see how the resin managed to still eat some of the foam through the pores of the plastic bag. The Tape made it less penetrable and the foam under the tape held up better.

Next I had to pull the bag out of the inside. This was another reason I used a bag, as the surface wouldn't stick very well. If using something that must be removed, a layer of vaseline will keep the resin from sticking.

Next I made a line around the box with a ruler at the level I wanted to cut.

Using a disc grinder, I was able to cut through the fiberglass easily for a smooth edge.

Testing the strength. I weigh 85 kilos.

My biggest learning experience was the edges of the box. I should have placed something under the box so it was elevated off the surface, so the extra edge could hang off straight. In many places it bowed or bubbled and I had to spend another day fixing these areas. I put some torn off mat fibers in the areas that didn't seal together, soaked them in resin...

and clamped them. Then allowed it to cure. This fixed the edges so all the way around they are strong and solid.
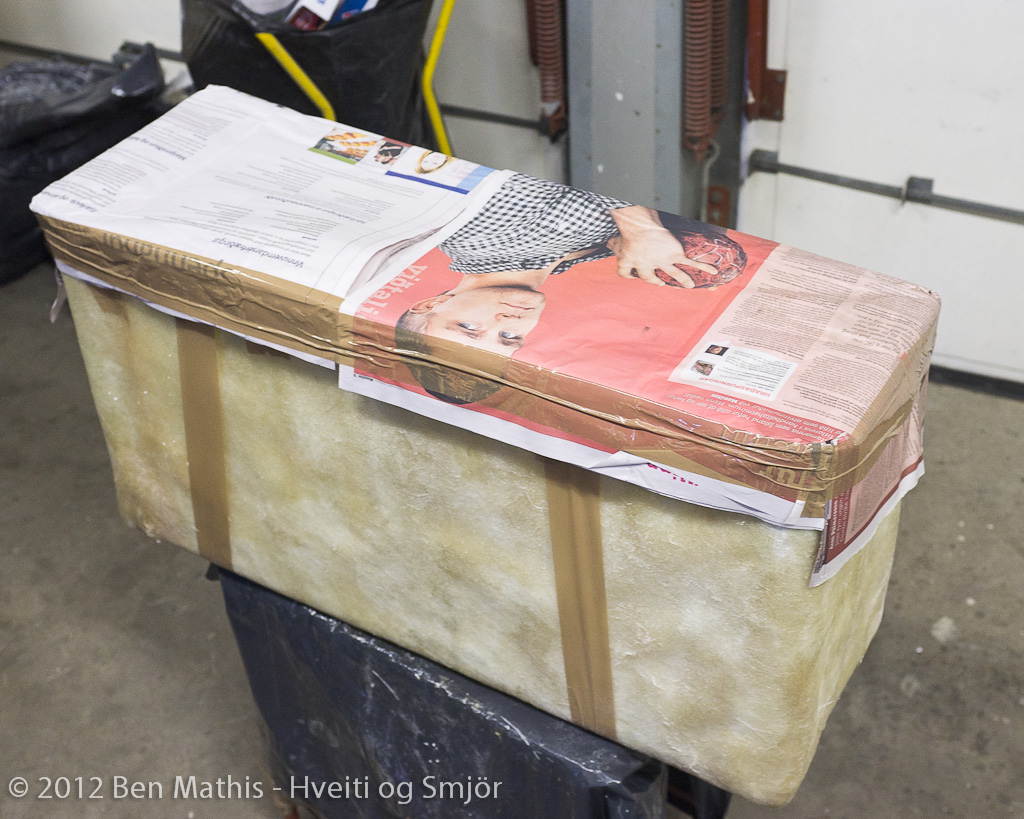
Bottoms done, now to make the lids. In order to ensure they would slide on easily, I needed some thickening buffer. I used newspaper, a whole sections worth, to thicket it up and make rounded edges. The box itself is filled with balled up newspaper, the foam chunks, and has a cardboard sheet over that to give it support and stay flat.

Once the newspaper was on, I taped again a plastic bag tightly around it all.

Paying special attention to the corners to make sure they were rounded.

The tops were actually three layers since they needed to be a bit stronger. I made sure to go well below where I would eventually cut them, and because of that, they had no problem bubbling or separating like the bottoms did.

You can see the roundness here. This was the hardest part of the process. I had to wet the mat with resin, wait a full minute for it to start to soften, then I could use the paintbrush in dabbing motions to get the mat to stick and interlock with the layers below it.

Once dry, I measured the cut marks while it was still on the box to make it easier.

You can see the T-square resting on the top, I marked in several places at 4cm, and then just laid a ruler across them all and drew a line.

After pulling the lid off, I was left with just the plastic bag liner.

Which was very easy to pull out.

Again I used the disc grinder to cut along the line.

Here is the cut off lip laying next to the finished lid. I sanded the edges to get rid of any splinters.

Fits perfectly! Each box weighs 5 kilos (11 lbs)

Next I had to paint the top coat. It is a special paint that also requires a Catalyst to activate. It dries quite hard and makes the fiberglass water and UV proof. It has wax inside of it that moves to the surface after you paint it on, blocking out oxygen so it can cure. This means it must be sanded before you can paint, to remove that wax layer.

I bought a tractor paint for extra durability. Green!

Strong yellow fabric tape for visibility and rounding the edges.

Small hinges keep the lids from bouncing off, and allow me to access the contents without having to place the lid somewhere while it's open.

The screws are quite small so I used washers to give them a bit more grip.

Now to attach them to the bicycle. This shows the Free Radical frame extender on the bike. The back wheel is removed from the bike, the free radical attached, and then the brakes, derailleur, and wheel are attached further back in the free radical frame. It has the mounts to attach bars for carrying larger loads.

The free radical is attached in two points. Here you can see the tongue is attached right behind the pedals.

An over view of the back of the bike, where the rear wheel normally mounts.

Here you can see the axel mounts of the bicycle attaching to the free radical instead.

These are plumbing mounts. Normally you would bolt these to the wall, and then clamp pipes into it. They have a rubber liner which allows a pipe to be clamped without crushing it. I chose these so the rubber would absorb some shock, and allow a slight flex to prevent any cracking of the fiberglass.

I ran a bolt from these clamps through the fiberglass box, using washers to increase the area of the grip to prevent cracking and give more support.

There are four mounts on the bottom. I used a washer and non-slip bolt to raise the mount points so the box was held firm.

Here you can see the other side, the bolt and washer on the inside. When all was secure and tight, I sawed off the protruding portion of the bolt.

I also added four wooden bars for rigidity, and to hold two shelves, this allows me to carry three full rows of four desserts. I've since ordered a one centimeter thick layer of foam to place on each shelf to help absorb shock.

The bicycle from behind. The reflectors are just taped on for now, but will be bolted on soon. The black strap was just for the inaugural rides, making sure they didn't fall off to the sides, but it's no longer needed as they are very secure without it. Four mount points on the bottom, and two on the upper inner side.

An angle view of the bike.

From the front.

And with me riding. The ride is very smooth, and the boxes do not rattle at all. I have done one delivery day with 11 orders, using one shelf per box as well as the bottom row, and the cakes all arrived safe and dry.
Nice one!
ReplyDelete